In this lesson, we’re going to start building a website.
This is probably my favorite part of the process because this is where what you imagined in your head becomes reality.
It's a great feeling to see your first website up and running.
I want to get into it right away so let's get started on your first website.
Your 11-Day Email Schedule
- Day 1: Welcome to the 11-day Affiliate Course
- Day 2: How to pick a profitable niche
- Day 3: How to pick an affiliate product
- Day 4: Building Your Income-Generating Website
- Day 5: Building Your Income-Generating Website (Part 2)
- Day 6: Marketing Your Website: On-Page SEO
- Day 7: Creating Your First Content
- Day 8: Marketing Your Website: Off-Page SEO
- Day 9: How To Monitor Your Performance
- Day 10: Double Your Earnings With Email Marketing
- Day 11: Easy Wins While You’re Gaining Authority
Important* Make sure you have done all the previous steps
before going to the next lesson.
Before we start we'll first eliminate the need to code our website by getting a content management system.
What is a content management system?
A content management system (CMS) is software that helps users create, manage, and modify content on a website without the need for technical knowledge.
In other words, a CMS lets you build a website without needing to write code from scratch (or even know how to code at all).
There are a lot of CMS (content management systems) that you can use to build your website but I recommend using WordPress.
There are a few reasons I prefer WordPress over all other CMS's.
1. WordPress is used by most website owners
Since WordPress is so popular almost all support tools are geared towards WordPress.
When new plugins are designed that provide your website with extra features they almost always focus on WordPress first.
Online tutorials and support teams most of the time also focus mostly on WordPress because it has the biggest audience.
2. WordPress is free
You can download WordPress on wordpress.org right now for free without any extra charges to use their services.
That being said, With WordPress alone, you can’t build a website.
You’ll also need a place on the internet to store your content but we’ll get into that later in this lesson.
So no need to download WordPress just yet.
3. Plugins give you full control
WordPress has a plugin library with hundreds of plugins that can add all types of features to your website without having to develop any technical knowledge.
Add tables, forms, Instagram galleries, website security features, and more in 2 clicks.
That being said before you start going crazy with all these plugins it’s important to know that plugins slow websites down.
You’re asking browsers to load additional data with every plugin that’s activated on your website.
I recommend keeping activated plugins to a minimum preferably no more than 5 activated at the same time.
4. WordPress is beginners-friendly
WordPress is made to facilitate people that don’t have experience with building websites.
It doesn’t require you to learn code, it’s easy to install, and it has hundreds of plugins they offer for free to customize your website.
In the past, I’ve worked with other content management systems and I have to say that this is the easiest one to work with by far.
Now let’s get into the things you need to build your website.
What do I need to build a website?
Every website consists of 3 components.
Below I've listed:
- What these components are
- Why you need these components
- How you can acquire these components
1. A domain name
A domain name or domain is similar to a real-life home address. It’s how people find your site online – they enter the domain name in a web browser or search engine.
It’s the name your website will be known by.
I recommend not short-circuiting your brain trying to come up with the perfect name. Some of the most famous companies in the world have names that don’t make any sense.
Think about it.
What’s a “Google”?
Just come up with something that’s simple and ideally describes the service you provide to your niche.
I recommend getting one at Namesilo.
The website is able to provide people with domain names without having to break the bank.
I'll go through the steps of acquiring a domain name later in this lesson.
2. Hosting
Hosting is an essential part of creating an online headquarters. A host provides you with space online where you can put all your content and function as a storage facility.
I recommend going with WPX hosting to get the most value out of your money.
WPX hosting specializes in WordPress hosting and is one of the fastest hosts on the internet. It’s a great solution for the long term.
There are better web hosts out there such as Kinsta, WP Engine, and Liquid Web but the prices shoot up when picking these hosting providers.
I recommend going for the cheapest plan called the “business” plan.
Especially when you’re starting there’s no reason to take one of the higher plans.
There are also some seemingly cheaper alternatives but I noticed they often come with either hidden costs or limitations making it hard to grow.
3. Website theme
A theme manages the overall appearance of the website.
Themes determine all design components: page layouts, backgrounds, color palettes, headers and footers, positioning, sizing, and typography.
80% of how your website looks is going to be determined by the theme that you pick. It’s the visual foundation of your website.
I like to think of the theme as walls, the roof, windows, and doors of a house. The content, menus, pictures, and videos are the furniture (which we’ll add later).
As soon as you, get your WordPress hosting you’ll have hundreds of free themes available for you to pick from.
I value flexibility so I often go with either GeneratePress or Astra.
They both have paid versions available that expand customizing abilities but a lot is possible even with the free version of the templates.
How to register a domain name with Namesilo
1. Go to namesilo.com and create an account
Sign-up to create a Namesilo account. After that, you’re able to use the domain availability search bar unlimited times.
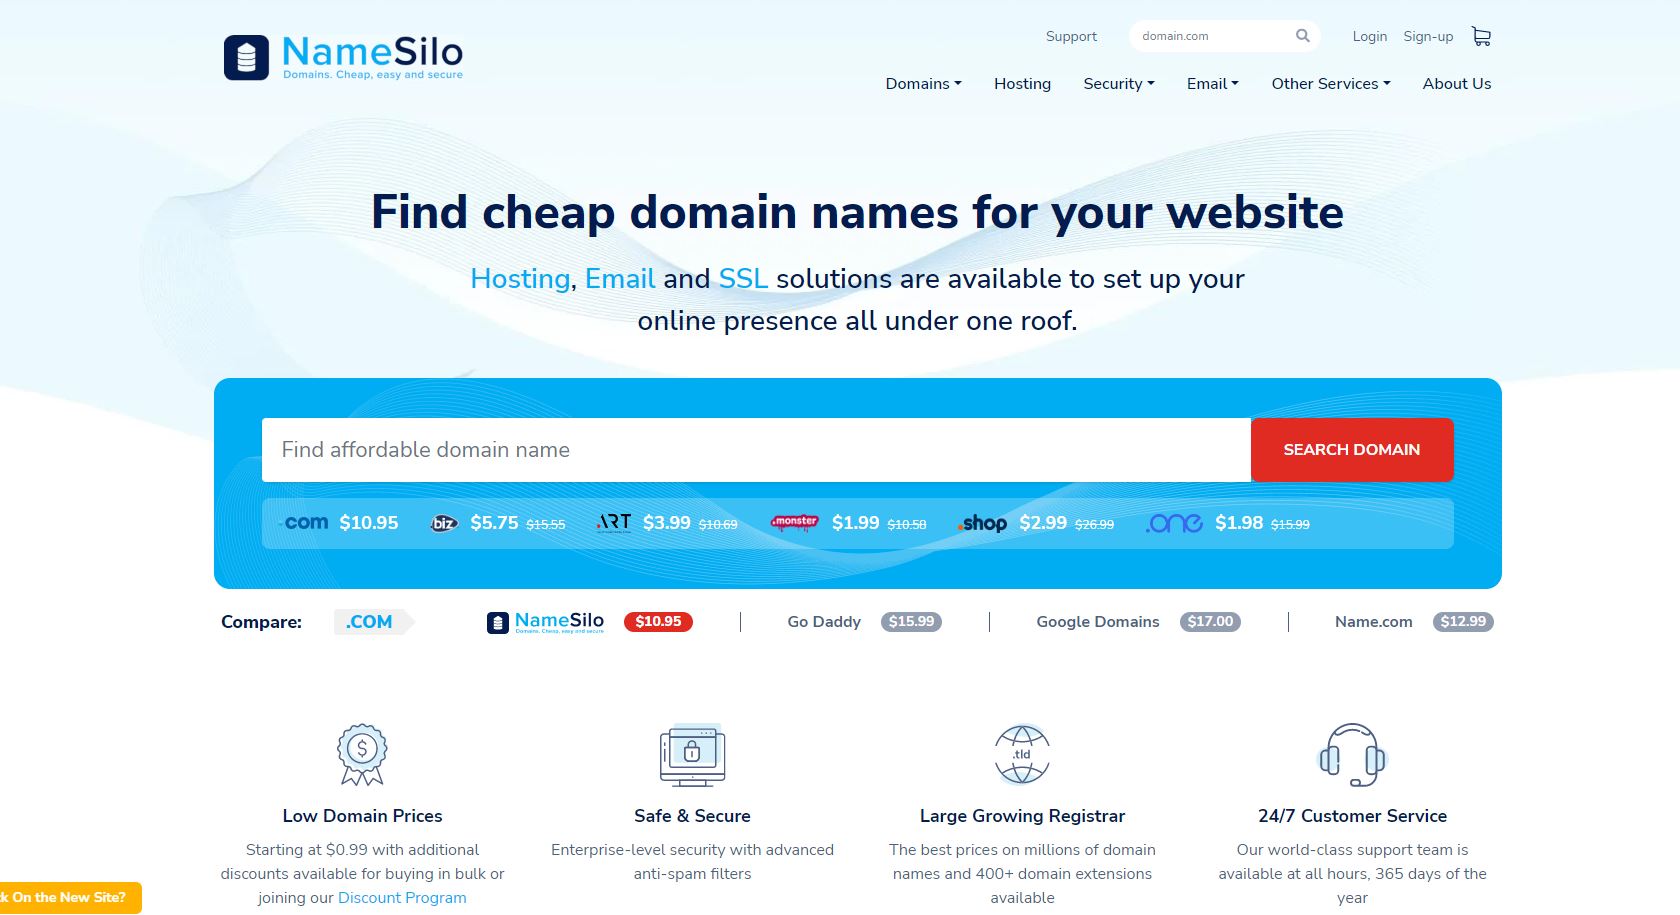
2. Look up domain availability
You can type in the name you’re interested in into the search bar and Namesilo will see if it’s available for you to purchase.
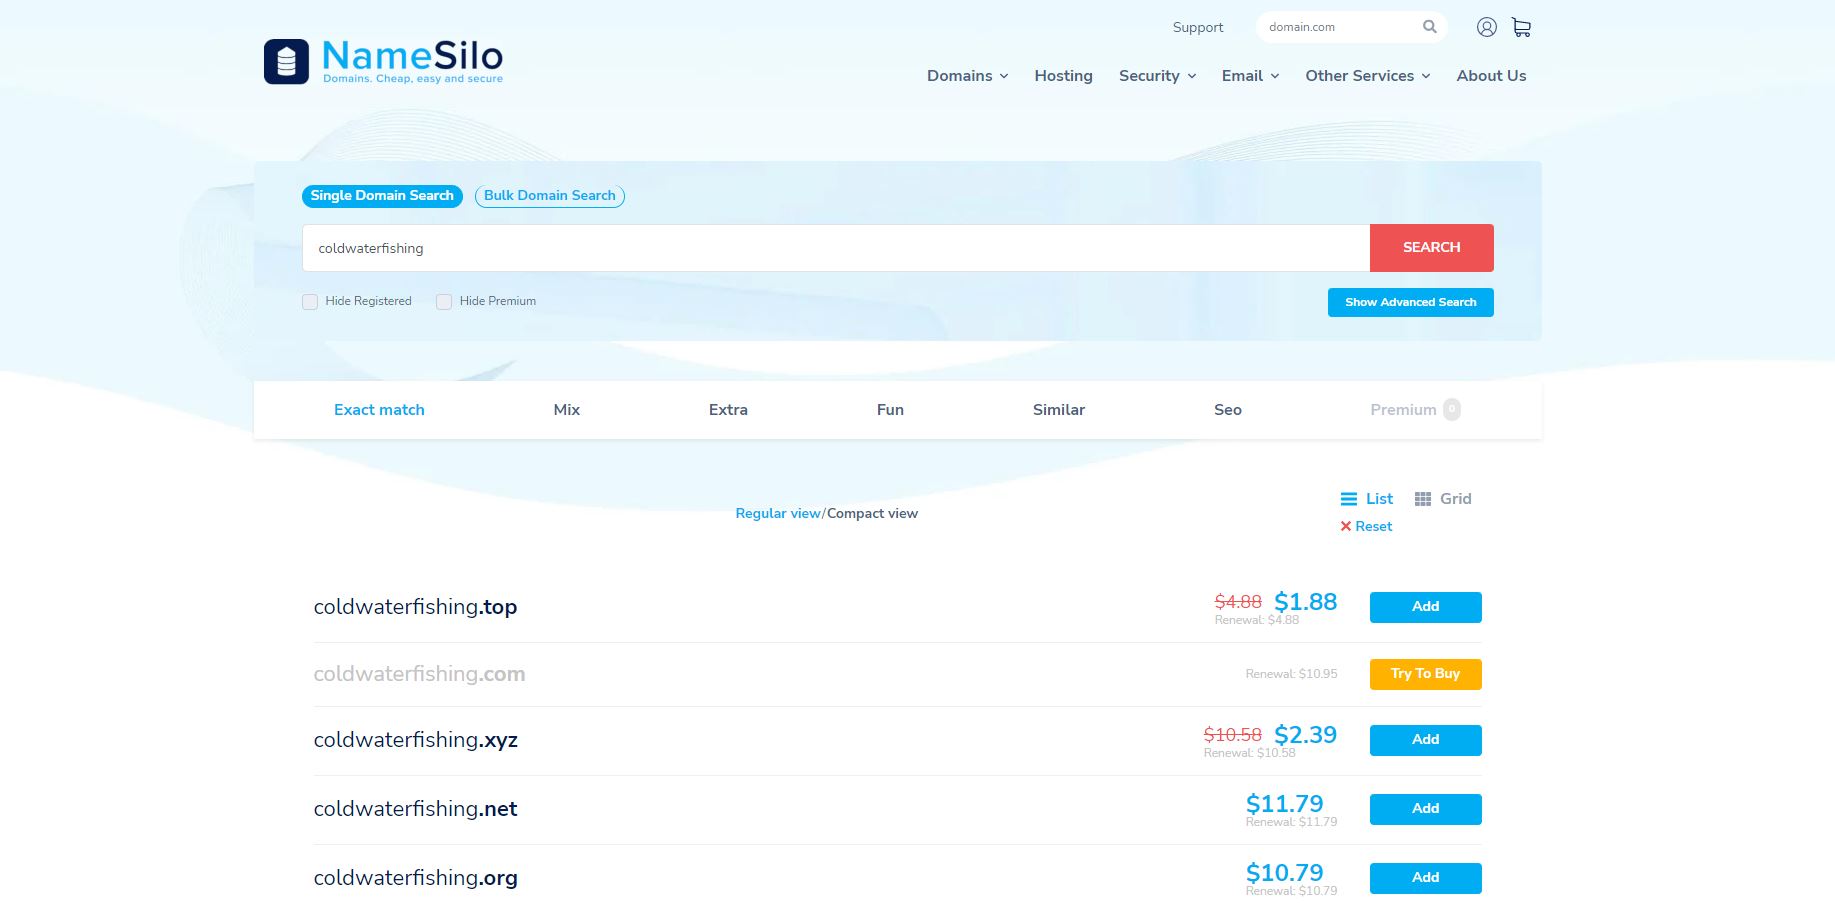
3. Check out process + choose WHOIS privacy
During the process make sure to add WHOIS privacy. This will keep your information private and prevent hackers from targeting you.
How to install WordPress
1. Log into your WPX account
2. Navigate to your hosting plan
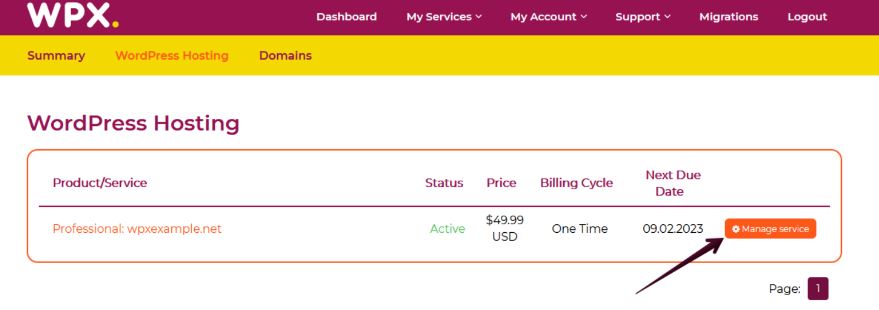
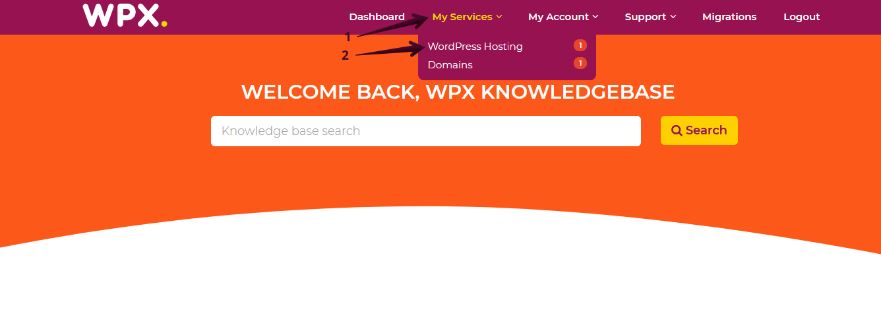
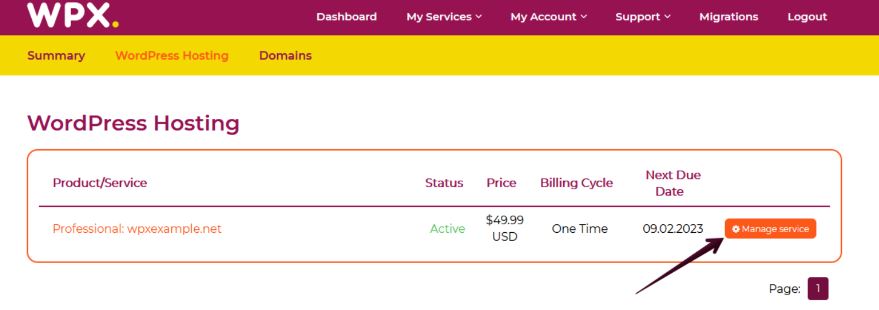
You can either find your hosting service through the navigation menu or within your dashboard. Once you log in to your WPX account select My Services (1) → WordPress Hosting (2).
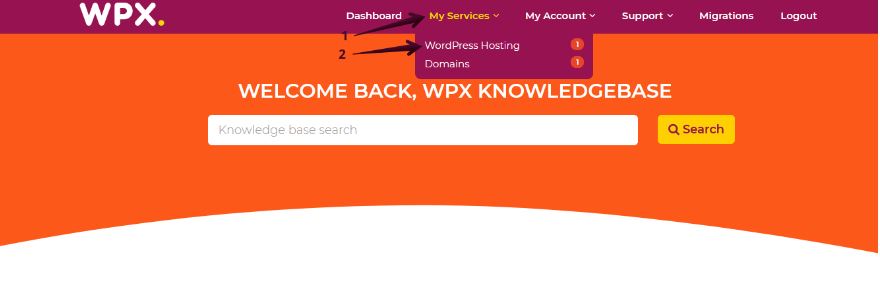
Then you will see all of your hosting plans with us. When you find the one you want to manage, click the orange button Manage service.
3. Go to the manage WordPress websites menu
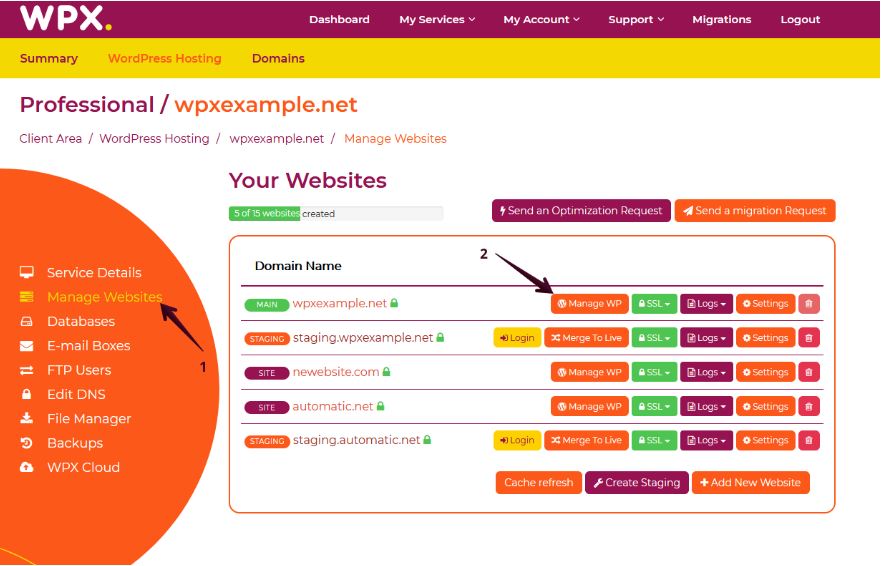
Now that you’re in the Hosting Panel, select the Manage Websites (1) menu. In this section, you can oversee, manage, and add new websites to your WPX account.
To install WordPress on one of your websites, click on the Manage WP (2) button on the right side of the website.
4. Install WordPress
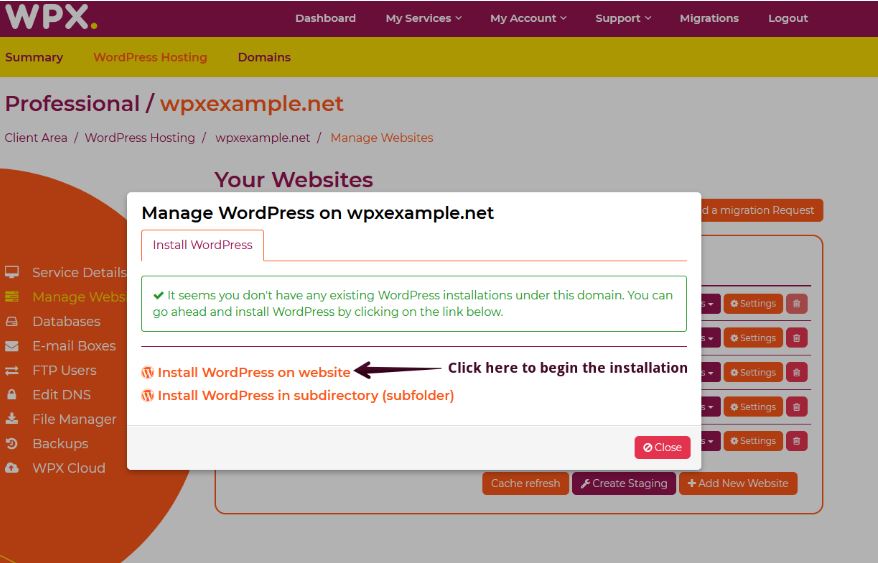
Once you have clicked on the Manage WP button, a pop-up will appear. You can either install WordPress in the root directory of the website or a sub-folder.
Another pop-up window will appear on your screen. Fill in your website and account details in the drop-down menu.
Once the fields are filled, click on Install WordPress to complete the installation;
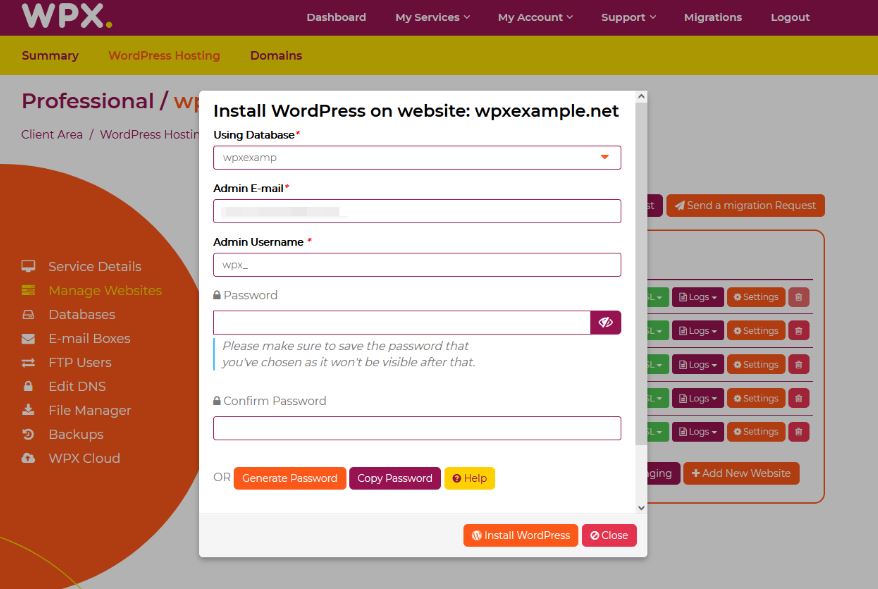
The password for your WP Admin user can be one of your choosing or automatically generated. If you want to automatically generate a secure password, press the blue button Generate Password.
At the bottom of the pop-up window, you have the option to install W3 Total Cache with our pre-configured settings automatically with WordPress.

We recommend installing W3 Total Cache with our settings for better performance. You can read more about that in this article here.
It is included by default with the installation of WordPress from the WPX Control panel.
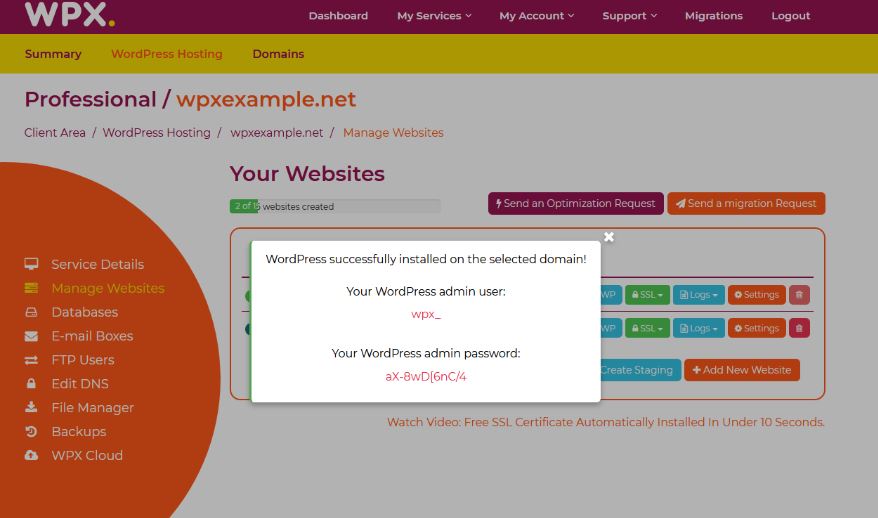
Make sure to copy and save your WordPress username and password. Don’t share your WP-admin login details with anyone.
When you add a website to your hosting panel, a database is automatically created and connected to the website.
That’s it! WordPress is now installed on your site!
Point domain to your web host
There are 3 ways to point a domain to your web host but for this lesson, I want to stick to the most simple method.
We’re going to change our nameservers.
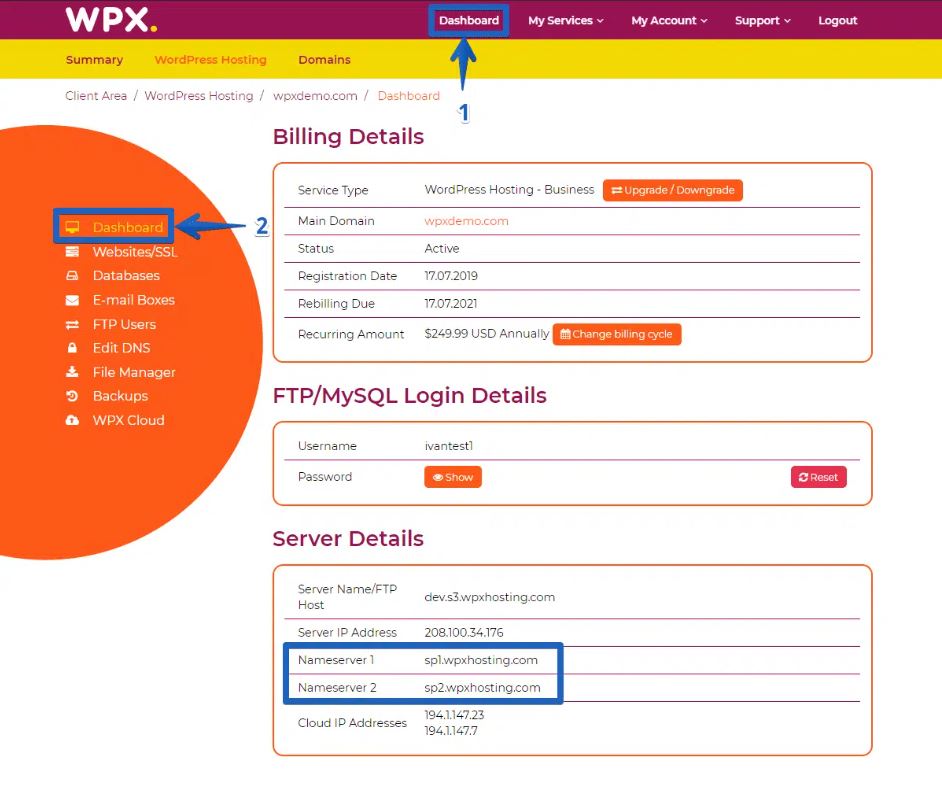
First, log into your WPX account and click on WPX Hosting Dashboard > Service Details at the bottom of the menu, under Server Details. Copy the nameservers.
You’re going to log in to your Namesilo account and go to the Domain Manager. Then choose the domain you bought, which will then direct you to the Domain Console.
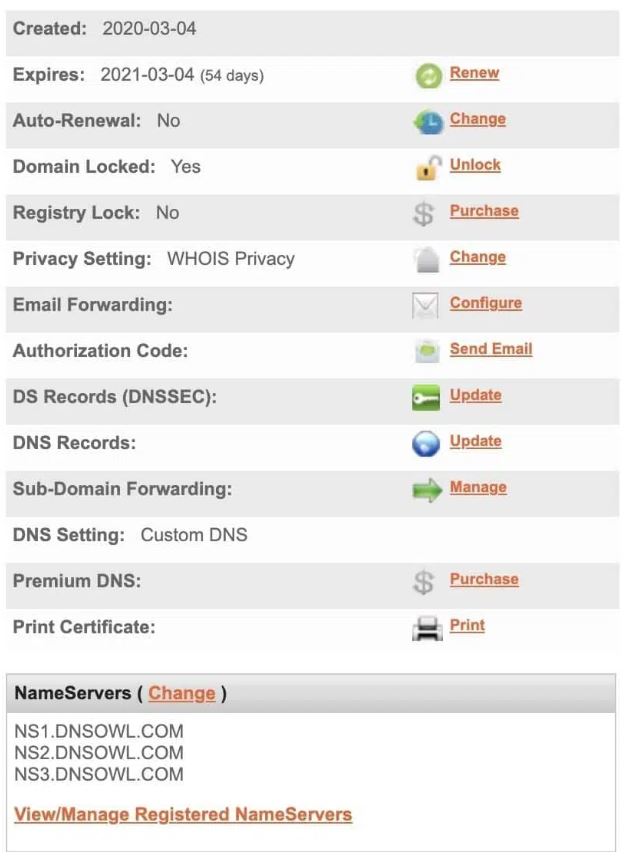
You will see the default nameservers, which look something like this:
NS1.DNSOWL.COM
NS2.DNSOWL.COM
NS3.DNSOWL.COM
Click “Change” and replace the default nameservers with the ones you copied from WPX Hosting.
It’ll take a while before it takes effect the last time I did it I had to wait 30 minutes.
After that, since your domain’s nameservers are changed to WPX Hosting, all of your DNS records will be managed in your WPX Hosting account.
How to generate free SSL
Step 1: Login into your WPX account
Once you log in to your WPX account select My Services (1) → WordPress Hosting (2).
Step 2: Navigate to your hosting plan
Then you will see all of your hosting services with us. When you find the plan that you want to manage, you need to select the orange button Manage service.
Step 3: Install the SSL certificate
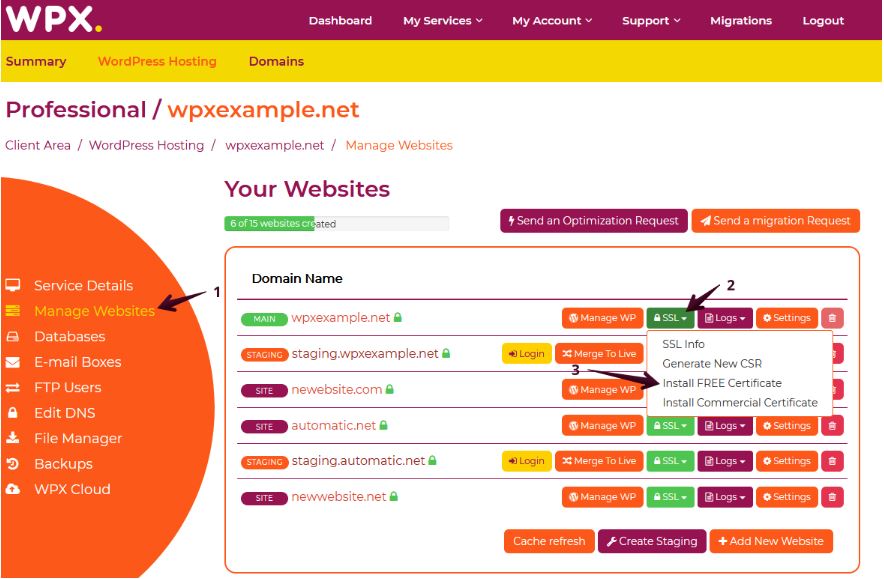
Now that you’re in the Hosting Panel, select the Manage Websites (1) menu.
You can proceed with installing the Free SSL certificate for the selected website. Click on the SSL (2) dropdown menu → Install FREE Certificate (3).
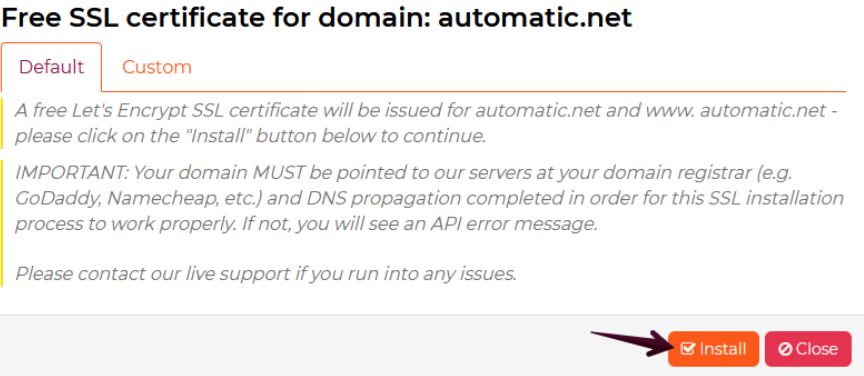
You will get a pop-up notification from where you click on Install which initiates an automatic process:
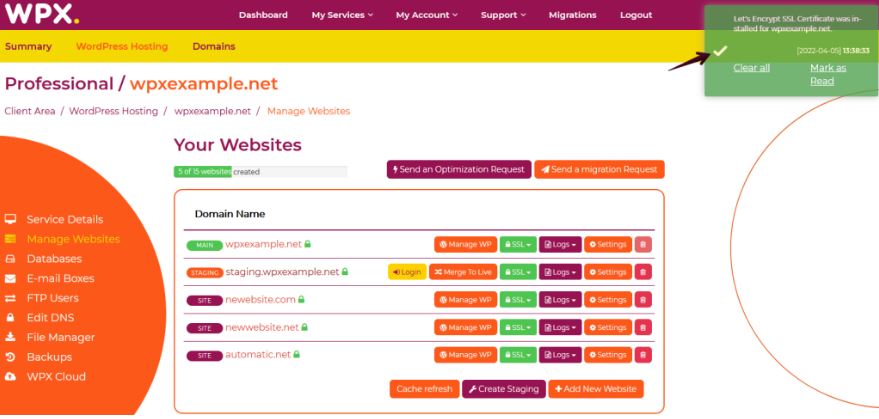
After the process is completed, you receive a notification on the top-right corner of your screen that indicates the SSL certificate has been successfully installed on the desired website.
Step 4: Configure HTTPS (Optional)
You would probably encounter an issue with Mixed Content which means that you’ll need to install “Really Simple SSL” and activate the plugin, the rest is done automatically by the plugin itself for you.
You can find it in the WordPress directory for free.
The plugin will force the content of your website to load via HTTPS.
Install Your Theme
Now go to your WordPress dashboard.
In your side menu on the left, you’ll see Appearances.
Go to appearances ⇒ Themes ⇒ Add New
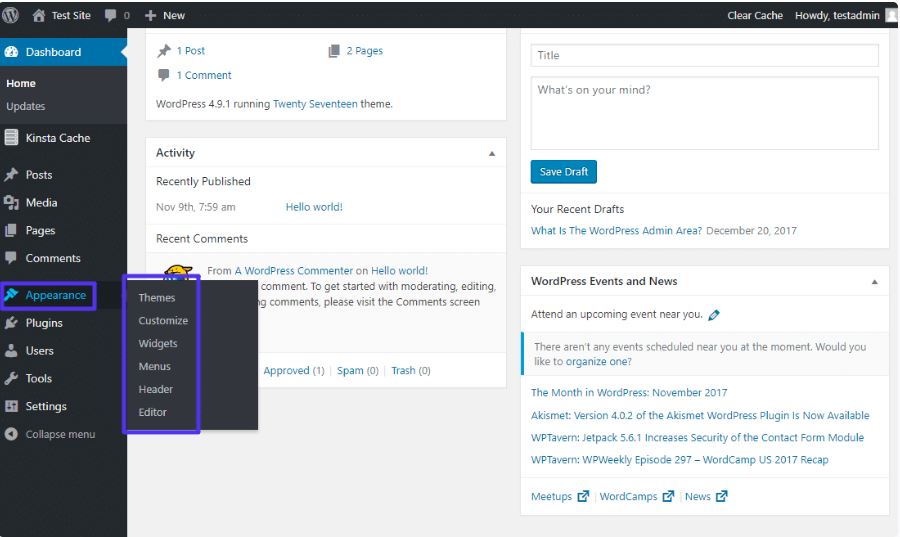
You’ll notice there’s a big selection of free Themes to pick from.
For most of my websites, I go with either GeneratePress or Astra.
In this lesson, I’m going with GeneratePress. It’s a free theme that is simple to customize and is very light which results in faster load time.
It does this without sacrificing functionality which is a rare thing for website themes.
Install a child theme
A child theme in WordPress would inherit all the functionality, features, and code of the parent theme without making any changes to the parent theme itself.
This allows you to make changes to your site using child themes without ever modifying the parent theme.
When a new version of the parent theme arrives, you can safely update it as all your modifications are saved in the child theme.
In the WordPress directory, you can type in your theme followed by the word “child” to get the theme. After that, you can install it in the same way you install the parent theme.
Set up how your URLs will be structured
Before we’re going to create pages we need to decide on what information the structure of URLs will be based on.
We go to our dashboard after which we’ll do this.
Settings ⇒ Permalinks
Permalinks is simply another word for URL.
Choose “post name”.
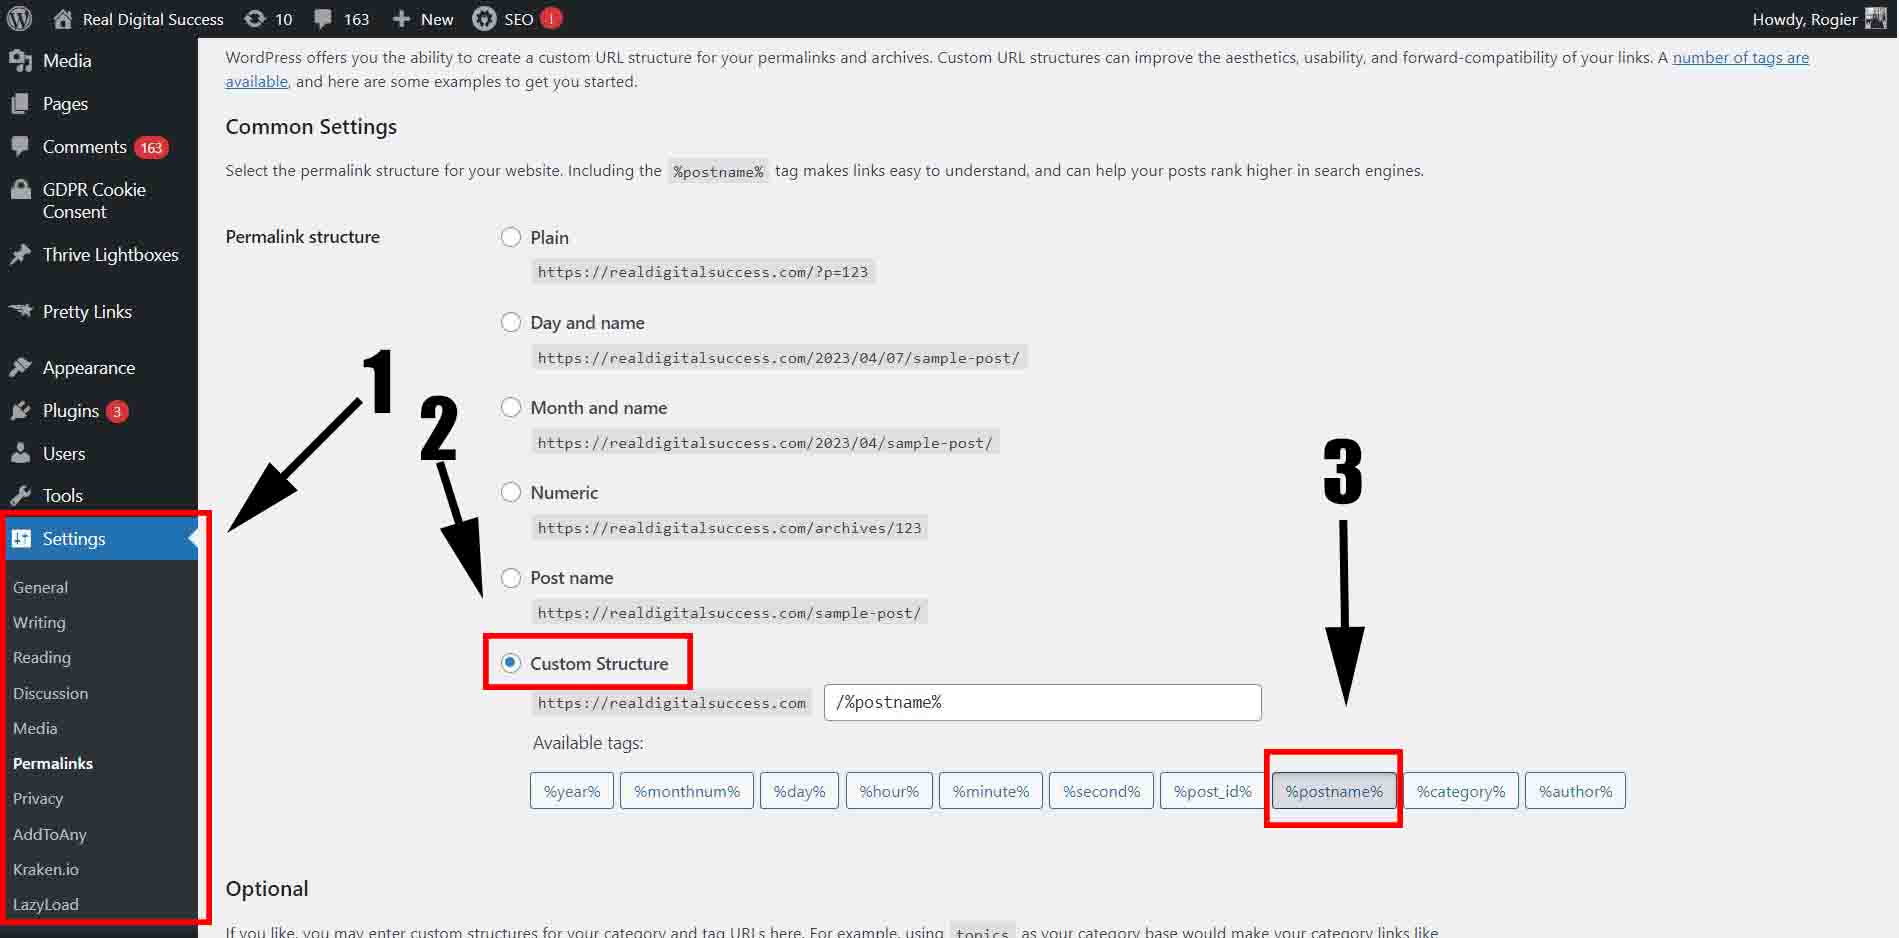
What this will do is use the name of your posts for the initial structure of your URL.
For example, let’s say my website was named coldwaterfishing.com and I created a page called What is cold water fishing?
Automatically the structure of my URL would become coldwaterfishing.com/what-is-cold-water-fishing
Now you have your entire house set up.
It’s still empty right now but in the next few lessons, we’re going to move in the furniture to complete our house.
Hope you're excited!
See you at the next lesson!
© 2023. Real Digital Success, All rights reserved.
